Overview
Use your laptop as a keyboard for another computer!
3/24/2010: If there is any interest in this project, please send me an e-mail at  ! I have not been working on it for a few weeks, because I’ve been working on other things, so your e-mail would be a motivator for me to continue.
I also have some extra PCBs available; if anyone is interested in purchasing one (with or without parts included/soldered) please let me know.
This project is a computer interface that will allow you to hook up your computer to another computer–for example, a “headless” computer– as a USB device, and use your laptop as a keyboard/mouse on the other machine.
There are 2 mini-USB connectors on this device. One side plugs into your laptop, the other side plugs into the computer without a keyboard. You type on the laptop, and the results will appear on the other machine. It will require special software on the laptop-side, but the destination computer should not require special drivers.
This is an open source project, with a GPL v3 license.
Questions? Please contact me at 
How to use it
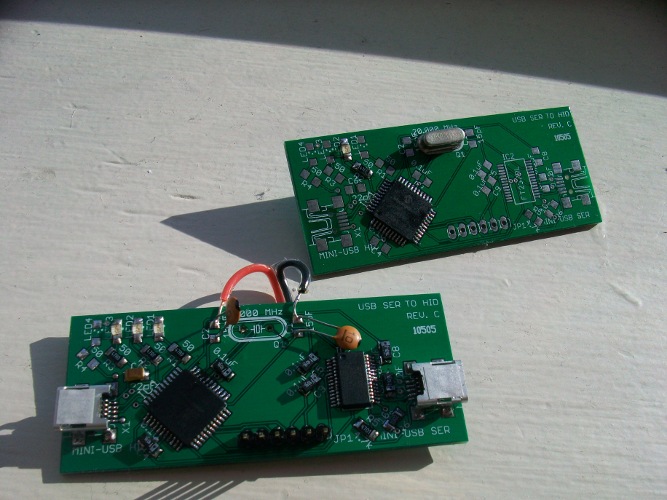
Using a mini USB cable, plug the “device” side into your laptop, then plug the “host” side into a desktop machine or an XBox 360 (coming soon). Open the software on your laptop, and start typing. The “device” side is the one with the rectangular-shaped chip closest to it. The “host” side is the one with the diamond-shaped chip closest to it.
Project Rationale
As someone who does I.T. consulting as a side job, I often get “additional work” (read: “people who ask me to fix their computer for free”). So, I’ll bring home someone’s desktop machine to clean up. I don’t have a lot of physical storage space, and as a keyboard can take up a lot of space, I don’t have one. I felt it would be much more convenient to use my laptop as the keyboard/mouse for the machine I’m fixing.
I could see someone also using this as an interface to a “headless” computer, or just for the installation part of a headless server with a monitor set up temporarily. I’d love to add a VGA frame grabber to this as well, perhaps in the future. I have seen a similar product on the Web for “crash carts”, except that it requires the user to take a physical keyboard/mouse with them. I felt a laptop would be much more convenient because it gives the user access to a working computer.
Project Status
I have a working breadboarded prototype that uses a MAX232 as a level converter for a “real” serial port, instead of the FT232RL, which emulates serial in USB. I’m currently working on a board; schematics and Gerbers are posted below.
The firmware and software is in a very rudimentary proof-of-concept stage. Using my breadboarded prototype, I’m able to type keys on a second machine using a rudimentary Perl script. Using the Perl script, you can more or less use all letter and punctuation keys (as well as ESC and enter), and simulated arrow keys using Ctrl-U as up, and Ctrl-J,K, and L as left, down, and right, respectively. The Perl is Windows-dependent because of the serial port control, but porting to Linux/MAC OS should be extremely easy.
Feb 3, 2010: Adding alpha-version windows software below.
Updates
Jan 30, 2010: After my difficulty with the REV C board, I have sent the latest revision board (rev. C1) to BatchPCB for the creation of a prototype. I have also created a breakout board for the FT232RL, which I have home-etched, in order to continue to do testing on my design. What I have finally realized from my earlier failures is that the Rev. C problems were a firmware issue, and not a hardware one as I had thought. So, Rev. C probably would have worked!! Oh well… live and learn.
I will be posting a new firmware and Perl script very soon.
Right now, I am typing on a second laptop from the breadboarded version of this project, with the FT232RL breakout.
Feb 3, 2010: I’ve realized that mouse support is really needed with this. I think I have figured out that dual keyboard/mouse support should be relatively easy to support. So it’s probably coming soon.
Feb 17, 2010: Received the prototype boards from BatchPCB about two weeks ago. Keyboard support works fine by itself, but I’m working on getting composite mouse/keyboard support.
TO DO
The software is probably going to be written in wxWindows or another portable GUI. A GUI will be required to be able to utilize the arrow and function keys on the laptop, since there are no ASCII codes for those to be sent through the serial line directly.
Once I have worked the entire system out, I plan to make the firmware upgradeable by USB instead of by ICSP header.
I plan on adding mouse capability, but I do not know when. This is going to require help and/or a lot of work, because I do not understand the HID specification, and whether mouse and keyboard functionality can be combined in one without the user having to install special drivers. Whether this actually gets completed will probably depend on whether there is any interest in this project; however I have a vested interest in the keyboard portion so I will probably complete that.
On my wish list, I’d love to add a VGA frame grabber to make it a full KVM solution.
Task List:
- Finish Windows software
- Figure out how to capture all keyboard/mouse events in system, similar to how a PC emulator captures all events.
- Linux software
- Add mouse support
- Continue to refine firmware
- Add USB bootloader for easy firmware updates.
- XBox 360 support
- This would be a useful device to have for an XBox 360, since most people probably don’t want a keyboard lying around the house. In theory, I think it should work the way it is… but it doesn’t, and I don’t know why.
- Boot-up support
- Does not seem to function on a computer that is booting (i.e. to get into BIOS). Only works once the OS is booted.
- From Googling, it seems like there is a boot mode for HID devices, may need to figure that out.
- Maybe add PS/2 emulation for older systems.
- Move USB connectors to center of board, they are in a weird spot
- Add ferrite bead to schematic for EMI protection
- Have the board fully powered by the serial end(?) Not sure about this.
- Power from serial end allows it to start up the whole circuit just by having it plugged in to the host.
- Power from both ends (as it is now) may conform to the USB spec better, because I think there are certain extra things that need to be done with regards to the USB spec for self-powered devices.
How it Works
The side that gets plugged into your laptop is a USB-to-serial port converter. The required software sends key codes to the Microchip 18F4550 microcontroller side, which acts as a USB Human Interface Device (HID) on the other computer. The microcontroller translates the serial data into keystrokes on the destination side.
The “device”-side software passes HID key codes directly to the firmware of the device, which then relays them to the “host” side. This design allows new key codes to easily be added on the device side, without having to reprogram firmware.
Gallery
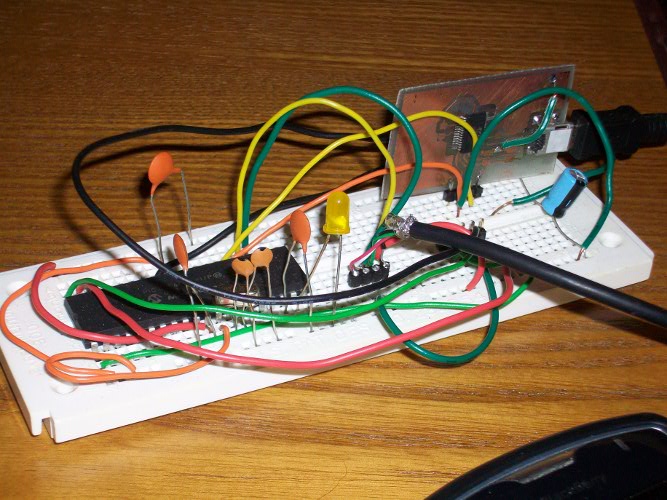
This is my prototype. Don’t be scared off by the serial port interface: the final version will use USB on both sides.

Latest prototype pic: notice the FT232RL breakout board. I was able to compact everything nicely on to one prototyping board.

Photo of my first prototype PCBs in various stages of construction. The PCB in front has been destroyed from oversoldering; I have been trying to work out the bugs in the PCB layout with much help from the experts in the forums at SparkFun.com. The through-hole capacitors that are soldered on are there because the crystal was not working, so I was experimenting with different capacitor values. I did not have any 10pF SMT caps lying around, so I decided to try the through-hole ones. I have just started populating the board in the back.
In case anyone is wondering, the boards were made by BatchPCB, and they seem very high-quality and were very inexpensive.

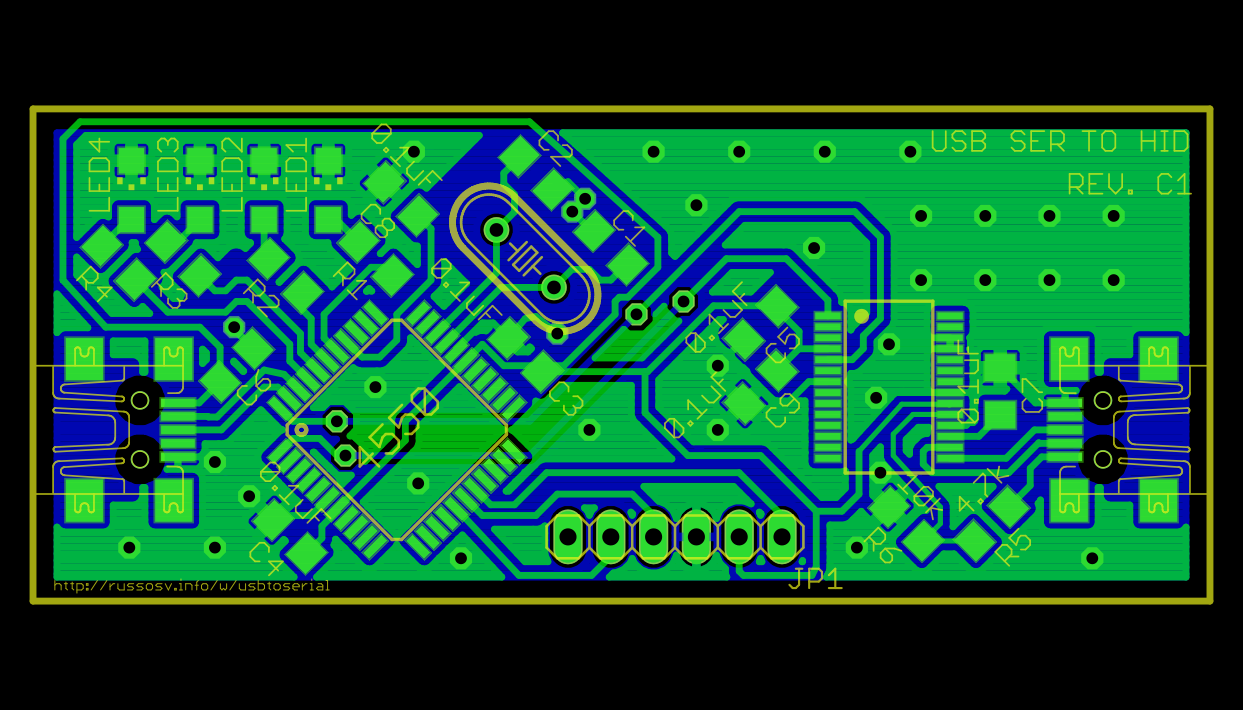
Here’s a picture of the newer board layout:
Setup used to develop firmware
I have MPLAB IDE from Microchip.com, as well as a PICKit 2 programmer to program the firmware.
Project Files
Eagle CAD files, current gerbers
Last update 12/18/2009 Revision C1 Eagle files – Contains the current schematics, board layout, and gerbers.
Device Firmware/Perl Software
Last update 1/30/2010
Proof-of-concept firmware – This requires MPLAB ICE and the Microchip USB Framework.
Perl software should be run on the “device” end… that is, the keyboard you’re typing on. Perl software runs on Windows only (ActivePerl), but it should be very easy to make it run on Linux.
Windows Software
Last update 2/3/2010
Alpha-release of Windows software – Very rudimentary Windows software for the “device” end, but it allows you to type many more characters than the Perl software did.
You must connect with the software at 250000 baud
USB Descriptor Tool – For creating configuration descriptors
Datasheets
-
Ferrite Bead – Ferrite bead used for EMI protection.
See Also
KVM2USB – Epiphan System’s KVM2USB– a similar idea. Mine was independently conceived, but I found this when I thought of the idea.
-
Composite HID/HID Mouse Joystick device example on Microchip.com.ru (Original Russian, untranslated) – See “Lesson # 3. Composite USB device.”
-
SAA7112 – Video capture ic
-
TVP7000 – Texas instruments video digitizer
Copyright Notice and Disclaimer
© 2009-2011 Steven V. Russo, all rights reserved with respect to the GPLv3 license.
USE OF ANY OF THIS HARDWARE/SOFTWARE IS AT YOUR OWN RISK.

